
Welcome to Fabulous Friday and Big Shot Embossing Mats: Tutorial #1.
In my last blog, I shared many uses for the Big Shot Embossing Mats to multiply the value of our existing crafting supplies. These Mats are new in in the Stampin’ Up! 2018-2019 Annual Catalogue and are an absolute winner!
If you would like to refresh on the uses of the Mats, this link will get you back to the previous blog ‘Exploring the Possibilities. Big Shot Embossing Mats.’
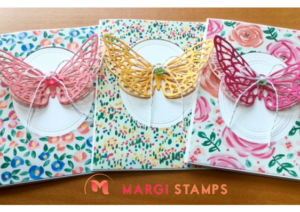
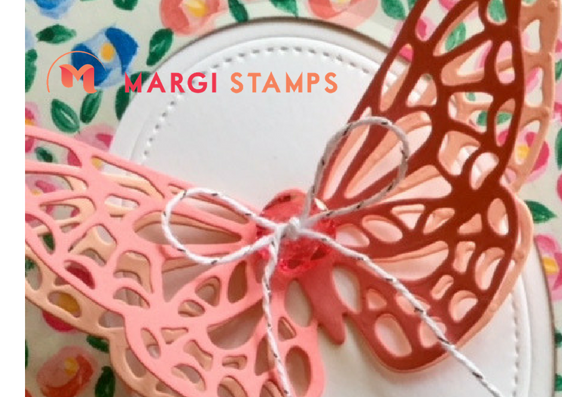
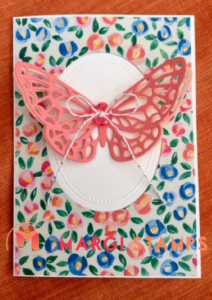
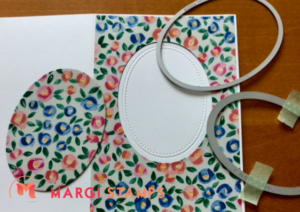
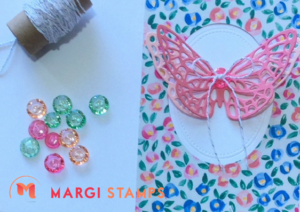
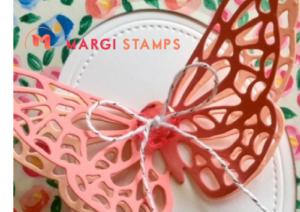
Here is a selection of my creations just for you. I have used the largest oval in the Layering Ovals Framelits collection. The coordinating Stitched Shapes Ovals add a 3D focal point for the gorgeous butterfly from Springtime Impressions Thinlits. They also showcase the hand painted designs of the Garden Impressions 6” x 6” Designer Series Paper. There are so many gorgeous possibilities. You might even be able to see that I’ve also experimented with two framing Stitched Shapes Framelits.
Let’s do a little recap: Big Shot Embossing Mats
The Embossing Mats are comprised of three items; the white Impressions Pad, the thin blue silicone rubber mat and the thick grey silicone rubber mat. You use two of these items with your regular Big Shot Platform in embossing mode and only one standard cutting plate. Generally, use the thin blue mat for a die that would normally cut and the thick grey mat for dies that would normally emboss.

Margi’s Step-by-Step Tutorial:
Card Base:
Create a 10.5 cm by 14.85 cm card base using your Stampin’ Trimmer. To make a portrait layout card, score one sheet of A4 Thick Whisper White at 10.5 cm vertically down the length of the card stock. Rotate card stock 90 degrees and cut at 14.85 cm. You will then have two card bases, one to use and one to keep. There is no need to fold and burnish the card base at this stage.
Card Front Layer
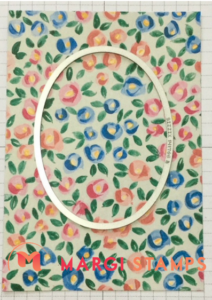
For your pretty floral card front layer, cut a piece of Garden Impressions Designer Series Paper (DSP) at 10.2 cm x 14.55 cm. As, this is a 6” x 6” DSP stack, I used the corresponding imperial measurement of 4”x 5 ¾”. This left me with a 2” strip of DSP to use for another design at a later stage.
Butterfly Accent
Cut one or two pieces of 6 cm x 10.5 cm of coordinating card stock. in these examples I layered two butterflies. Die-cut the butterfly using the Butterfly from Springtime Impressions Thinlits. Retain.
Putting it Together
Use the largest layering oval from Layering Oval Framelits to define and cut your oval accent from the 4” x 5 ¾ piece of DSP. I placed my oval in the centre of the paper, vertically and slightly above centre horizontally. Cut using the Big Shot and your regular or magnetic platform.
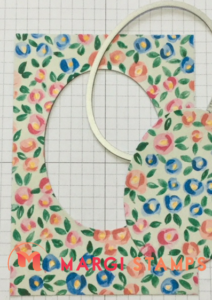
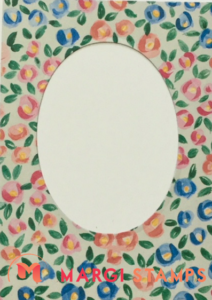
Adhere the DSP frame to the card front. I used Multi Purpose Liquid Glue to ensure the DSP was adhered around the oval frame.
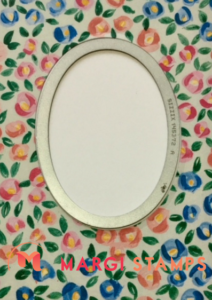
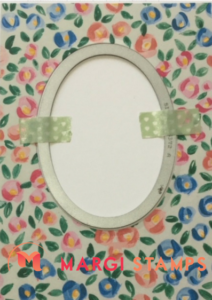
Place the largest Stitched Shape Oval Framelit in the centre of the oval frame. You will then need to anchor the Framelit to the card to ensure it does not move during the next steps. I used washi tape that I had reused several times. You need to remove some of the stickiness from the washi, to ensure that you can peel off the washi after embossing. The pressure required to emboss is also the pressure that will ‘stick’ your washi to the card base if you don’t do this step.
You’re then ready to emboss…getting excited!
Embossing Sandwich
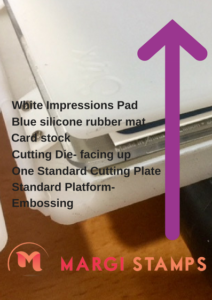
This is the sandwich that I used, from the bottom up:
- Big Shot Standard Platform in Embossing Mode
- One Standard Cutting Pad
- The card front, die on the bottom facing up. (You use the washi tape to correctly place the oval as you will not be able to see it).
- The blue silicone rubber mat,
- The white Impressions Pad.
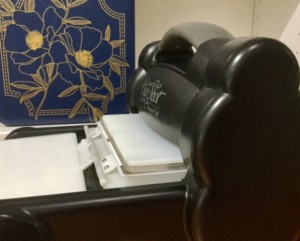
Run the assembled sandwich through the Big Shot. You may think there is no pressure and that there’s nothing happening…. but wait till you see. It’s gorgeous! Un-washi your die gently and viola, you’re nearly there!
Adhere the body of the die-cut butterfly (or two butterflies) to the centre of the embossed oval. Using Glue Dot add a Tinted Faceted Button and finish off with a pretty bow using Silver and White Bakers Twine.
I have purposely left this card without a message or greeting as I know it is a design I will use many times. I can then stamp the greeting and message to suit the occasion.
Supplies and Heroes.
Product List
 Designer Series Paper")


I’m sure the list of possibilities is endless! Naturally, if you have any queries, please don’t hesitate to contact me.
LOVE IT. LIVE IT. SHARE IT.

